
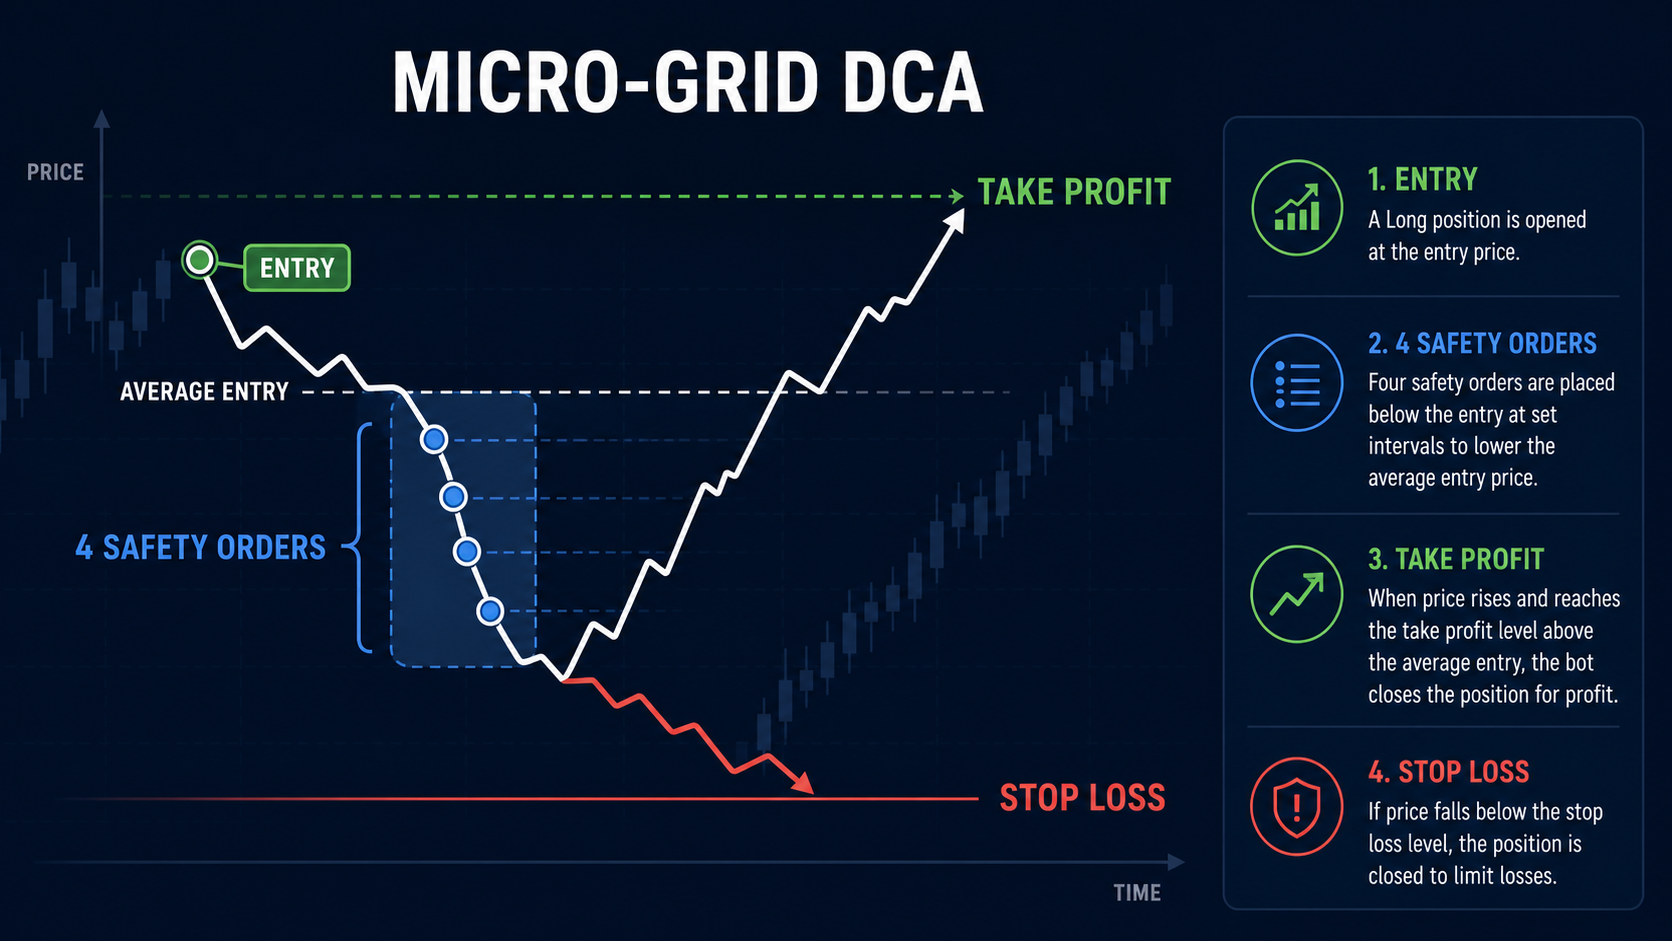
Micro-Grid DCA with Stop Loss is a short-range crypto-bot strategy. Instead of a deep averaging grid, the bot uses a small number of safety orders-often three to five-inside a limited price corridor, then exits at a hard Stop Loss. It is designed to absorb a modest pullback, improve the average entry, and avoid turning a short-term idea into an uncontrolled long-term position.
The strategy is commonly used for active intraday or scalping scenarios. It does not guarantee a profit: normal volatility can trigger the stop, while fees, slippage and leverage can increase the realized loss. Use it only with a defined risk limit and a liquid market.
How the micro-grid works
- The bot enters a Long or Short position from a defined signal.
- If price moves moderately against the entry, it fills a few nearby safety orders.
- Those fills adjust the average entry price.
- A rebound can reach Take Profit from the new average price.
- If price breaks beyond the planned range, Stop Loss closes the entire position.
The grid is intentionally small. Unlike a deep DCA system, it is not built to wait through a large trend. The Stop Loss is therefore a core part of the design, not an optional extra.
Key settings to define
Range, order count and spacing
Choose a price coverage range that reflects the asset’s normal volatility on your timeframe. Three to five safety orders can cover a small pullback without committing capital to a broad decline. Equal spacing is easy to interpret; slightly wider steps can reduce fills from market noise. Test the combination rather than assuming one percentage suits every pair.
Order sizes and Stop Loss
Decide whether each safety order has the same size or a controlled size increase. Calculate total exposure after every safety order is filled. Place Stop Loss beyond the grid where the original setup is invalidated, not merely below the last order. On futures, keep liquidation price comfortably away from both the grid and the stop where possible.
Illustrative example
A Long trade opens at 100 USDT. Four safety orders are distributed down to 96 USDT within a 4% corridor, with Take Profit calculated from the average entry after fills. A Stop Loss sits below the corridor, for example near 95 USDT. If price dips, fills the grid and rebounds, the bot can close at its target; if the market continues to weaken, the stop limits the planned loss. These figures illustrate structure only and are not a recommendation.
When this strategy may fit
- A liquid pair is oscillating within a small, identifiable range.
- You have a short-term signal and a clear level that invalidates it.
- You want limited averaging, but do not want to carry a deep grid through a strong trend.
- Your position size remains safe even after every safety order is filled.
Risks and launch checklist
A Micro-Grid can fill its orders quickly during a sharp move. Before starting, verify the total allocated capital, leverage, minimum order size, fees, stop trigger method and potential slippage. Avoid widening the Stop Loss after entry just to keep a losing trade open. Review a series of trades across different volatility conditions before changing parameters.
FAQ
How many safety orders should a micro-grid use?
There is no fixed number, but three to five is a common compact structure. Use the count only after testing it against the asset’s volatility and your risk limit.
Is a Stop Loss required?
For this strategy, a hard stop is the main protection against a move that exceeds the narrow coverage range. Without it, the trade becomes a different, deeper DCA approach.
Bottom line: Micro-Grid DCA is for controlled, short-range averaging. Its advantage is flexibility during a modest pullback; its discipline is a predefined exit when the market structure fails.