
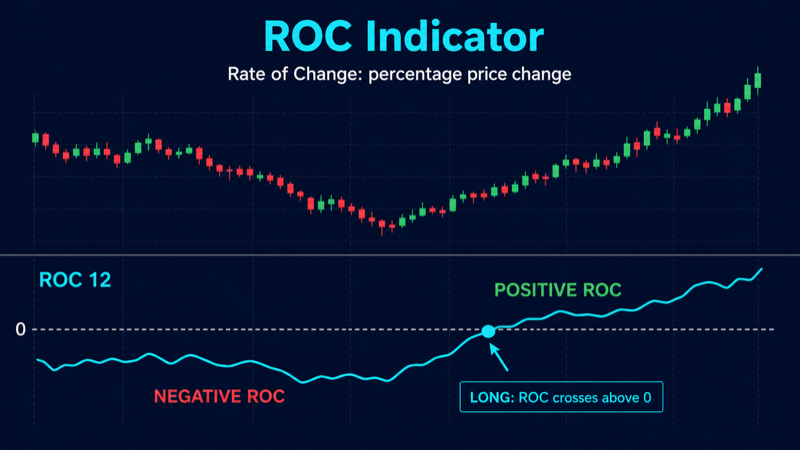
The Start Bots Signal category describes signals and indicators that can start a trading bot. One of the technical indicators is ROC (Rate of Change).
When creating or editing any bot, there is a Start signal builder block at the bottom of settings. You can choose individual indicators, ready-made presets, and their combinations. Conditions are grouped: AND inside a group, OR between groups. The same indicator can be configured in different ways - for Long and Short, for breakouts and bounces, for level comparisons and for crosses.
What is ROC
ROC (Rate of Change) is a measure of how fast price is changing, expressed as a percentage. It shows how much the current price differs from the price N periods ago, relative to the past level. If the asset rose 3% over the interval, ROC = +3; if it fell 2%, ROC = −2.
Unlike “raw” Momentum, ROC normalizes movement: values are comparable across BTC, ETH, and altcoins - everything is in percent. The zero line is the key reference: above zero, bullish impulse dominates over the selected period; below zero, bearish impulse dominates. In the ELIXOAI start signal builder, ROC is used as an automatic bot start condition - when the indicator crosses zero or reaches a percent threshold.
ROC highlights acceleration: a sharp price rise quickly pushes the line into positive territory; fading trend pulls it back toward zero. Thresholds like +2% or −2% help filter weak oscillations. Traders often combine it with trend filters (EMA, price position) - especially in sideways markets where zero crosses produce many false signals.
ROC vs Momentum, RSI and MACD
All four tools relate to impulse, but measure it differently:
- Momentum is the arithmetic difference Close − Close[N] in price points. The same percentage move on BTC and a cheap altcoin yields different Momentum values. ROC divides the difference by the past price and multiplies by 100 - the result is in %, comparable across instruments.
- RSI normalizes movement into a 0–100 scale by comparing average gains and losses. RSI answers “how strong was the move relative to recent history,” while ROC answers “by what percent did price change over N periods.” RSI has 30/70 zones; ROC’s main level is 0, plus arbitrary % thresholds.
- MACD is built as the difference between two EMAs and shows convergence/divergence of trend averages. MACD is smoother and slower than ROC; it is often used with a signal line for crosses. ROC is a direct percent rate without extra smoothing - faster but sensitive to volatility.
How ROC works
The calculation is standard for a rate-of-change indicator:
ROC = ((Close − Close[period]) / Close[period]) × 100, where Close is the current candle close and Close[period] is the close N candles ago. The builder output is ROC %.
- ROC > 0 - price is higher than N periods ago; bullish impulse (e.g. +5 means a 5% rise).
- ROC < 0 - price is lower than N periods ago; bearish impulse (e.g. −3 means a 3% drop).
- ROC = 0 - price equals the level from N periods ago; neutral impulse, equilibrium point.
In the builder you set a comparison condition: “ROC crosses above 0,” “ROC greater than 2,” “ROC less than −1,” and so on. The system fetches live ROC from the exchange via TAAPI and checks the condition on your timeframe - at candle close or every minute.
Period parameter
- Range: 1 to 300 (optInTimePeriod).
- Default: 10 - balanced for 15m–1h; a classic short-term impulse setting.
- Short period (3–5): ROC reacts faster, more zero crosses, more noise. Useful on 5m for scalping - catch short impulse spikes.
- Long period (20–50): smoother ROC, less frequent sign changes. Better for 1h–4h swing - fewer but more sustained impulse signals.
ROC(10) on 5m and ROC(10) on 4h are different indicators. When changing timeframe, revisit period, signal type (cross vs gt/lt), and % thresholds.
Ready-made presets in the builder
The builder offers one ROC preset with default settings. You can fully customize it: different operator, level, period, or timeframe.
ROC cross_up 0 - bullish impulse (rocp)
Default condition: ROC crosses level 0 from below to above (cross up) on the selected timeframe (15m interval, period 10, check at bar close).
A Long signal on impulse turning positive: price is rising faster than N periods ago - ROC moved from negative or neutral into positive. Unlike “ROC > 0,” the cross captures the transition moment, not just current position above zero. For Short, set operator “crosses below” and target 0.
Available operators- Crosses above (cross up): ROC was below the level and moved above. Classic Long setup - cross up 0: start of positive impulse.
- Crosses below (cross down): ROC was above the level and dropped below. Short signal - cross down 0: impulse turned negative.
- Greater than (gt): ROC is strictly above the level right now. E.g. ROC > 0 - sustained bullish impulse; ROC > 2 - rise of more than 2% over the period.
- Less than (lt): ROC is strictly below the level. ROC < 0 - clear bearish impulse; ROC < −2 - drop of more than 2%.
- Greater or equal (gte): ROC is at or above the threshold. Handy for “ROC ≥ 0” filter on a higher timeframe.
- Less or equal (lte): ROC is at or below the threshold. Bearish context filter: ROC ≤ 0 on 4h.
Zero is ROC’s main reference: cross up 0 means price rose above the level from N periods ago; cross down 0 means it fell below. You can also set percent thresholds: ROC gt 3 for strong impulse, ROC lt −3 for a clear drop. In a strong trend ROC can stay above or below zero for a long time - then gt/lt gives earlier entry while cross gives a more precise impulse shift.
General builder settings
- Timeframe (interval): 1m, 5m, 15m, 30m, 1h, 4h, 1d. Shorter intervals give more signals but more noise. Swing bots often use 1h–4h; scalping uses 5m–15m.
- Check mode: At candle close checks after the candle closes - fewer false triggers. Every minute checks inside the current candle - faster reaction, higher false-start risk.
- Operator: greater than, less than, crosses above, crosses below, greater or equal, and others define how the indicator value is compared to the target.
- Target value: a number (e.g. 30 for RSI), an indicator line (e.g. %D for Stochastic), or price (for Bollinger Bands).
- Condition groups: up to 3 groups with up to 5 conditions each. Example: group 1 - RSI < 30 AND price < lower band; group 2 - Stochastic < 20. The bot starts if group 1 OR group 2 is satisfied.
Setup examples for different strategies
Scalping: period 5 on 5m–15m
Goal: frequent starts on short impulses.
Long: rocp preset, cross up 0, 5m timeframe, period 5, check at bar close.
Short: cross down 0, same settings.
Filter: add price above EMA 20 on the same 5m - fewer false crosses in a range.
Swing: period 20 on 1h–4h
Goal: fewer but more meaningful moves.
Long: ROC cross up 0 on 4h, period 20, check at close - bot starts on a sustained impulse shift.
Short: cross down 0 on 4h, period 20.
Period 20 on a higher TF smooths noise and signals closer to a “real” trend turn.
Trend confirmation
Goal: Long only when impulse and trend align.
Group 1: ROC cross up 0 on 15m AND close price above EMA 50 on the same 15m.
Short: ROC cross down 0 AND price below EMA 50.
EMA shows direction; ROC confirms the move is accelerating in percent terms.
Breakout
Goal: start the bot on impulse after consolidation.
Long: ROC gt 1 on 15m (period 10) AND price cross up upper Bollinger Band (20, 2) on the same interval.
Short: ROC lt −1 AND price below lower BBands.
ROC gt 1 confirms the breakout is backed by more than 1% speed, not a random spike.
ROC + EMA
Long: price cross up EMA 20 on 15m AND ROC cross up 0 on the same 15m - double confirmation: both price and impulse turned up.
Short: price cross down EMA 20 AND ROC cross down 0.
Alternative: ROC gt 0 AND price > EMA 50 on 1h - trend Long on sustained impulse.
Short on impulse shift
Condition: ROC cross down 0 or ROC < 0, period 10, 15m, check at close.
Filter: RSI > 65 in the same group - short after overbought with fading impulse confirmation.
Fits short grids at local peaks when upward momentum slows.
Strong impulse (gt filter)
Long: ROC gt 2 on 1h, period 10 - bot starts only with more than 2% rise over the period, without waiting for a cross.
Short: ROC lt −2 on 1h.
Useful in trends where cross up 0 already happened but impulse still favors you. Downside - later entry vs cross.
Pullback in trend
Group 1: ROC on 4h greater than 0 (period 20) AND ROC cross up 0 on 15m (period 10).
Logic: higher TF shows sustained bullish impulse; lower TF catches resumption after a short correction. Fewer false starts against the global trend.
ROC + RSI
Long: RSI cross up 30 on 15m AND ROC cross up 0 on 15m - oscillator and percent rate aligned.
Short: RSI cross down 70 AND ROC cross down 0.
RSI catches oversold/overbought; ROC checks that price actually accelerated in the right direction.
Multi-timeframe
Long: ROC on 4h ≥ 0 (separate condition, gte, period 20) AND ROC cross up 0 on 15m (period 10).
Short: ROC 4h ≤ 0 AND ROC cross down 0 on 15m.
This avoids buying every local ROC spike against global bearish impulse on the higher interval.
DCA on pullback
Long: ROC cross up 0 on 1h (period 14) AND RSI < 45 on 1h - impulse bounce from weakness without extreme oversold.
Short: ROC cross down 0 AND RSI > 55.
For a DCA bot on trend pullbacks, cross up 0 is softer than strict RSI < 30 - fewer false entries during ongoing drops.
Condition groups: practical example
Bot with two Long scenarios:
Group 1: ROC cross up 0 on 15m AND price > EMA 50 - trend impulse resumption.
Group 2: ROC gt 2 on 1h (period 20) AND RSI < 40 on 15m - bounce with confirmed higher-TF impulse.
Groups combined with OR: either scenario can start the bot. Configure Short symmetrically (cross down 0, ROC lt 0).
Tip
In a ranging market ROC constantly oscillates around zero: cross up 0 and cross down 0 trigger often and produce false bot starts. Increase period (20 instead of 5), add an EMA filter, or require ROC ≥ 0 on a higher timeframe. To filter noise, use percent thresholds (gt 1 instead of gt 0). In pure chop ROC is a weak standalone signal - combine with Bollinger breakouts or trend context. Use check at bar close to ignore intrabar noise.